コロナ禍でもあり、遠隔からのサポートも改めて課題になっています。
勿論、RDPやVNCなどでの遠隔操作もありですが、セキュリティ面やハード障害児の対応を考えると、ハードウェア的アプローチが必須になります。
サーバー専用機では、リモートコンソール機能なども数万円のオプションとして販売されて居るものを使うか(HPE iLo/DELL iDRACなど)IPKVM(ATEN CN80000Aなど)を使うかと言うのが一般的でしょうか?
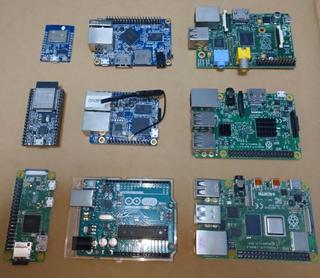
なかなか、価格がネックになり気軽に配備する事は難しかったのですが、RaspberryPiを使った、プロジェクトがありました。$100で実現すると言う売りですが‥
https://github.com/pikvm/pikvm
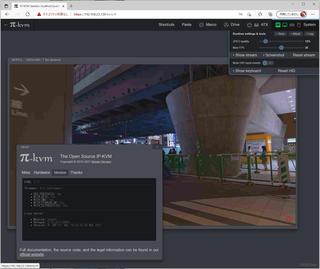
- リモートビデオ
- キーボードマウス操作
- リモートメディア機能(ISOなどのアップロードをしてCDやFlashドライブのエミュレート)
など、基本機能は全て実装されています。
]]>

RaspberryPiは、3/ZeroW/4に対応して居る様ですが、ZeroWと4ではUSB-OTG機能を活用する事で、特別な外付けハードウェア無しでキーボード・マウスのエミュレーションが出来ます。
ビデオ取り込みは、HDMI-USBドングルを利用するか、HDMI-CSI変換を利用してカメラインターフェースから取り込めます。安定性・パフォーマンスではCSIへの変換が良い様です。
今回のポイント
RaspberryPi 4かZeroか?USBかCSIか?
- パフォーマンスと安定性狙いで、HDMI-CSI変換を使う方法を試しました。
- RaspberryPiは、USB-OTGのシンプルさも有り、ZeroWか4ですが、サイズや価格面からZeroWで行きたいと思います。
参考までに、 - HDMI-USBでに取り込みでは、確かに遅延が発生し操作がしづらくなります。- ZeroWではUSBドングルでの取り込みは対応しません。 - 画像転送のパフォーマンスはZeroWではやはりパワー不足で低いです。FullHDで5FPS程度、1280x1024で10FPS程度でした。
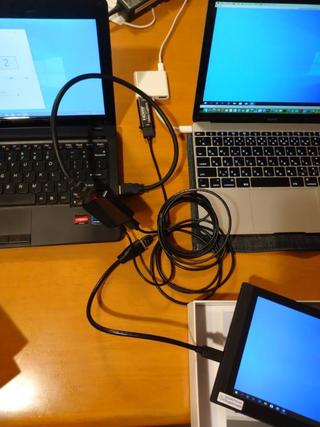
接続環境の想定
低コスト、小型と言う天から、やはり展開の手軽さ素早さは重要と考えます。 - ZeroWではWiFiでの接続になります。Pocket WiFiやスマホのテザリングなどでの中継を想定したいと思います。 - インターネット回線を使うことを想定し、何らかのVPNが必要そうです。最近マイブームのSoftEtherでチャレンジしてみます。
利用ハードウェア
- RaspberryPi Zero WH
- HDMI to CSI Bridge
- TC358743XBGを搭載したもの
- 5000円ぐらい
- 参考 https://www.ebay.com/itm/353070571951
- ストレージ
- その他小物類(必要に応じて)
- 電源アダプタ
- USBケーブル類
- HDMIケーブル類
- キーボード・マウス類(セットアップ用)

PiKVMイメージ作成
https://github.com/pikvm/pikvm
ここから導入、Ubuntuでイメージ作成
SoftEtherのビルド
https://w.vmeta.jp/tdiary/20190924.html
こちらにある問題にまさに当たり、ROファイルシステムでは起動しない。 CFLAGSで変更できるらしいのだが、やり方わからず、ソースに直接パッチを当ててビルドする。
この辺を参考にした。 https://bz-attachments.freebsd.org/attachment.cgi?id=180342
PiKVMのイメージをそのまま使ってビルド可能 RW設定にしてから、ソースからビルドする。
ROに対応させるため、最低限のファイルの作成先を変更するため、ソースに以下のパッチを適用する。
#define    SERVER_LOG_DIR_NAME            "/var/log/softether/server"
#define    HUB_SECURITY_LOG_DIR_NAME    "/var/log/softether/security"
#define    HUB_SECURITY_LOG_FILE_NAME    "/var/log/softether/security/%s"
#define    HUB_PACKET_LOG_DIR_NAME        "/var/log/softether/packet"
#define    HUB_PACKET_LOG_FILE_NAME    "/var/log/softether/packet/%s"
#define    NAT_LOG_DIR_NAME            "/var/log/softether/secure_nat"
#define    NAT_LOG_FILE_NAME            "/var/log/softether/secure_nat/%s"
#define    CLIENT_LOG_DIR_NAME            "/var/log/softether/client"
#define TINY_LOG_DIRNAME            "/var/log/softether/tiny"
#define TINY_LOG_FILENAME            "/var/log/softether/tiny/%04u%02u%02u_%02u%02u%02u.log"
#define CE_SNAPSHOT_DIR_NAME        "/var/log/softether/carrier"
#define    EL_PACKET_LOG_DIR_NAME    "/var/log/softether/etherlogger"
#define    EL_PACKET_LOG_FILE_NAME    "/var/log/softether/etherlogger/%s"Unix.c GetExeDirname()周辺を探して3箇所修正
Format(name, sizeof(name), "/run/.%s", tmp);
Format(name, size, "/run/.pid_%s", tmp1);
Format(name, size, "/run/.ctl_%s", tmp1);
SoftEtherの導入
- 完成したバイナリを保管
- 前項でビルドしたコンパイル済みバイナリの退避(保管)
- ./bin/配下を保管し、PiKVMイメージを戻す。(クリーンアップ)
- バイナリを配置
- 保管した ./bin/vpnserver vpnclient vpncmd vpnbridgeフォルダを /usr/配下にコピーする。
- 各フォルダ内の実行ファイルにchmod +xで実行権限付与
hamcore.se2には付与必要なし。
- 実行スクリプトを/usr/bin以下に配置
- chmod +xして実行権限を付与
- vpnclientの起動スクリプトのみ、接続後のアドレス取得などのために、辻褄合わせで、dhclientなどを起動して居る。(スキル的に他に良いやり方が思いつかない)
vpnclient

#!/bin/sh
mkdir /var/log/softether
/usr/vpnclient/vpnclient $@
sleep 10
dhclient vpn_vpn
exit $?
vpncmd

#!/bin/sh
/usr/vpncmd/vpncmd $@
exit $?
vpnbridge

#!/bin/sh
/usr/vpnbridge/vpnbridge $@
exit $?
vpnserver

#!/bin/sh
/usr/vpnserver/vpnserver $@
exit $?
- systemd起動設定ファイルの作成
/usr/lib/systemd/system/vpnclient.serviceファイルを作成systemctl enable vpncient で、自動起動を設定
vpnclient.service

[Unit]
Description=SoftEther VPN Client
After=network.target

[Service]
Type=forking
ExecStart=/usr/bin/vpnclient start
ExecStop=/usr/bin/vpnserver stop
KillMode=process
Restart=on-failure

[Install]
WantedBy=multi-user.target
- VPN接続設定の作成
vpncmdコマンドでコンフィグファイルを作成する。AccountCreateで接続設定作成AccountPasswordSetで接続パスワード設定AccountStartupSetで起動時の自動接続を有効化- その他
AccontListで一覧表示AccountConnectで接続実行(テストとか?)
[root@pikvm bin]# vpncmd
vpncmd command - SoftEther VPN Command Line Management Utility
SoftEther VPN Command Line Management Utility (vpncmd command)
Version 4.36 Build 9754   (English)
Compiled 2021/06/07 21:29:54 by buildsan at crosswin
Copyright (c) SoftEther VPN Project. All Rights Reserved.

By using vpncmd program, the following can be achieved.

1. Management of VPN Server or VPN Bridge
2. Management of VPN Client
3. Use of VPN Tools (certificate creation and Network Traffic Speed Test Tool)

Select 1, 2 or 3: 2

Specify the host name or IP address of the computer that the destination VPN Client is operating on.
If nothing is input and Enter is pressed, connection will be made to localhost (this computer).
Hostname of IP Address of Destination:

Connected to VPN Client "localhost".

VPN Client>
VPN Client>AccountCreate
AccountCreate command - Create New VPN Connection Setting
Name of VPN Connection Setting: test

Destination VPN Server Host Name and Port Number: v
xxxxxxxxx.softether.net:5555

Destination Virtual Hub Name: SoftEther

Connecting User Name: user

Used Virtual Network Adapter Name: vnic

The command completed successfully.

VPN Client>AccountPasswordSet
AccountPasswordSet command - Set User Authentication Type of VPN Connection Setting to Password Authentication
Name of VPN Connection Setting: test

Please enter the password. To cancel press the Ctrl+D key.

Password: ********
Confirm input: ********


Specify standard or radius: standard

The command completed successfully.

VPN Client>AccountStartupSet
AccountStartupSet command - Set VPN Connection Setting as Startup Connection
Name of VPN Connection Setting: test

The command completed successfully.

VPN Client>
その他 メモ
- netctlで自動設定時に、netctl start xxxとかやるけど。うまくいかない。 ip link set [dev] down で一度インターフェースをダウンさせてから実行しないとうまくいかないみたい。(謎)
- netctlのDHCP Client dhcpcdとdhclientが選べるみたい。
- DefaultGatewayの問題 標準のdhcpcdだと、取得時に強制的にデフォルトゲートウェイが設定され、同時に、VPNトラフィックが流れなくなってしまう。
- DNSの問題 ついでにresolv.confも書き換えてくれる。 どーすりゃいいの?何か設定がありそうだけど・・・
- DNS設定の問題 ROファイルシステムにして居る都合か、
/etc/resolv.confがWiFi側からの設定で常時上書きされない。 初回起動時のDNS設定を覚えてしまって居る。 一瞬RWに変更して、書き換えてROに戻せば対応可能だが・・・ なんとかならないものだろうか・・・
- ifplugd入れてみたけど・・・ 使い方よくわからん。 よくわからないので、vpnclientの起動スクリプトから直接dhclientを叩く事にした。
]]>